Tools & Supplies Needed To Build and Maintain a Model Railroad
by Steve Gillett
Two of the first things a new model railroader discovers are that they want something better than a loop of track on the
dining table or floor and that building and maintaining a model railroad and the associated rolling stock requires tools
and supplies.
By clicking on this link (
Tools & Supplies Table),
you will find an organized list of the tools and supplies that are needed for various activities involved in building a layout and
keeping its engines and cars operating smoothly. Most of these items are self-explanatory. Some are not absolutely required,
but make that particular task easier to accomplish.
The list includes three custom made tools that are easy to build. Here are the instructions on how to make them:
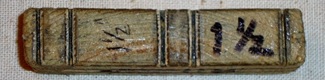
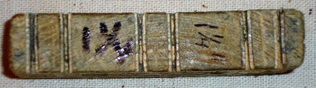
Track Spacing Tool
When laying parallel tracks most modelers want to maintain a constant space between
them. For example, an N-Trak module has three main tracks, each 1½" apart. The trick is to lay the outer-most track first,
make sure that the straight sections are truly straight, and that the curved sections maintain the desired radius throughout
the arc. A simple jig can be made from a scrap piece of 1" x 4" lumber (which is really ¾" x 3½"). Cut a block that is 1"
high and 4½" long (and obviously, ¾" thick.) Sand the block to eliminate any splinters. Next, take three pieces of Atlas 5"
sectional track, lay them parallel to each other and glue them firmly to another scrap of wood. Measure the spacing closely
so that they meet the N-Trak specs of 1½" from rail to corresponding rail.
Once the glue has dried, take a Sharpie or other marking pen, color the rail heads, then place the wood block across the
tracks at a 90° and tap the block firmly with a hammer. This action will leave black indentations on the bottom of the
block showing where the six rails are. Then, simply deepen those indentations with a coping saw or thin blade back saw.
Deepen them only 1/32" which is enough to let the rails fit in the grooves, but not so deep that the tool hangs up on rail
joiners or the plastic molded spikes.
Note that the pictures are of my original tool which I didn't make quite long enough and, as a result, the 1½" side only has
one rail of the 3rd track. The 1¼" side is the recommended spacing for N-scale yard tracks.
Then, since you have already laid the outer track where you want it, all you have to do is to glue down the 2nd and 3rd tracks,
align the rails of all three tracks in the jig, and slide the jig along the outer track, thereby automatically repositioning the
other two tracks to their proper place and with the proper spacing. If the outer rail is straight, the other two will also be
straight. Work curves from the largest to the smallest. Using the tool to align tighter radius parallel tracks will minimize
any variance in the outer track. Working from a smaller radius to a larger radius will magnify any deviances, so avoid that
situation.
Arc Drawing Tool


To make sure your curves have a constant radius, you need a drafting tool. Take a piece of 2x4 lumber and rip a 38" long
piece that is between 1/8" and 3/16" thick. Sand it completely. Draw a line down the center of the strip from one end to the
other. Drill a 3/32" hole through the stick on the center line about 1" in from one end and mark that hole as the zero point.
Then take a measuring tape and mark 1" intervals on the strip starting 9" from the hole and continuing to the other end of the
strip. Label these marks showing the distance in inches from the original hole. Drill 3/32" holes at the centerline for each
1" mark. Finally, drill the same size holes ¼" each way from the “zero hole", but slightly off center, and one hole on the
centerline that is ½" from the zero hole and closer to the end of the stick. Clearly mark the hole that is ¼" closer to the
end of the stick as +¼" and the other one as –¼", and finally, mark the hole that is ½" closer to the end of the stick as +½".
Now you have the equivalent of a long radius protractor. Simply find and mark the focal point of your curve, place proper
origin hole over the focal point and then tap a small nail through the tool and into the surface of the layout. Place your
pencil in the hole with the radius you want, and draw the arc. Obviously if you want a 25½" radius curve you put the nail
in the hole ½" back from the zero mark and your pencil in the 25" hole. If you want a hole that is 25¾" radius. Put the
nail in the -1/4 hole and the pencil in the 26" hole.
I have two of these protractors, one 4' long for long radii of 20" to 46" and one 2' long for tight radii of 9" to 22".
HINT: If you have clearance problems with the tool from skyboards or other obstacles, reverse the tool, putting the pencil
where the nail should be and the nail where the pencil should be. That way the tool only extends an inch past the arc you're
trying to draw.
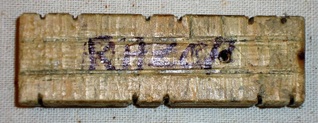
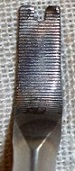
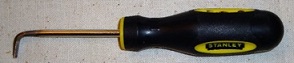
Rail Joiner Tool
Most modelers have a preferred way to install rail joiners to pieces of track. Some use hemostats, some a flat blade
screwdriver, and others a small pair of needle nose pliers. I use a customized flat blade screwdriver that has a notch
in the tip and is bent about 75°. Find a small, flat blade screwdriver with a grip that feels good in your hand. Cut the
notch with a Dremel tool that is just wide enough to fit over the rail and about 3/32" deep. Heat the tip of the screwdriver
with a propane torch until it is red hot, place the tip in a vice about ½" then bend the tip about 75°. Let it cool and then
you have a wrist-friendly tool that easily slides rail joiners into place.